Viewing entries in
sewing

70s cushion revamp!

Comment

70s cushion revamp!

IMG_8436.JPG

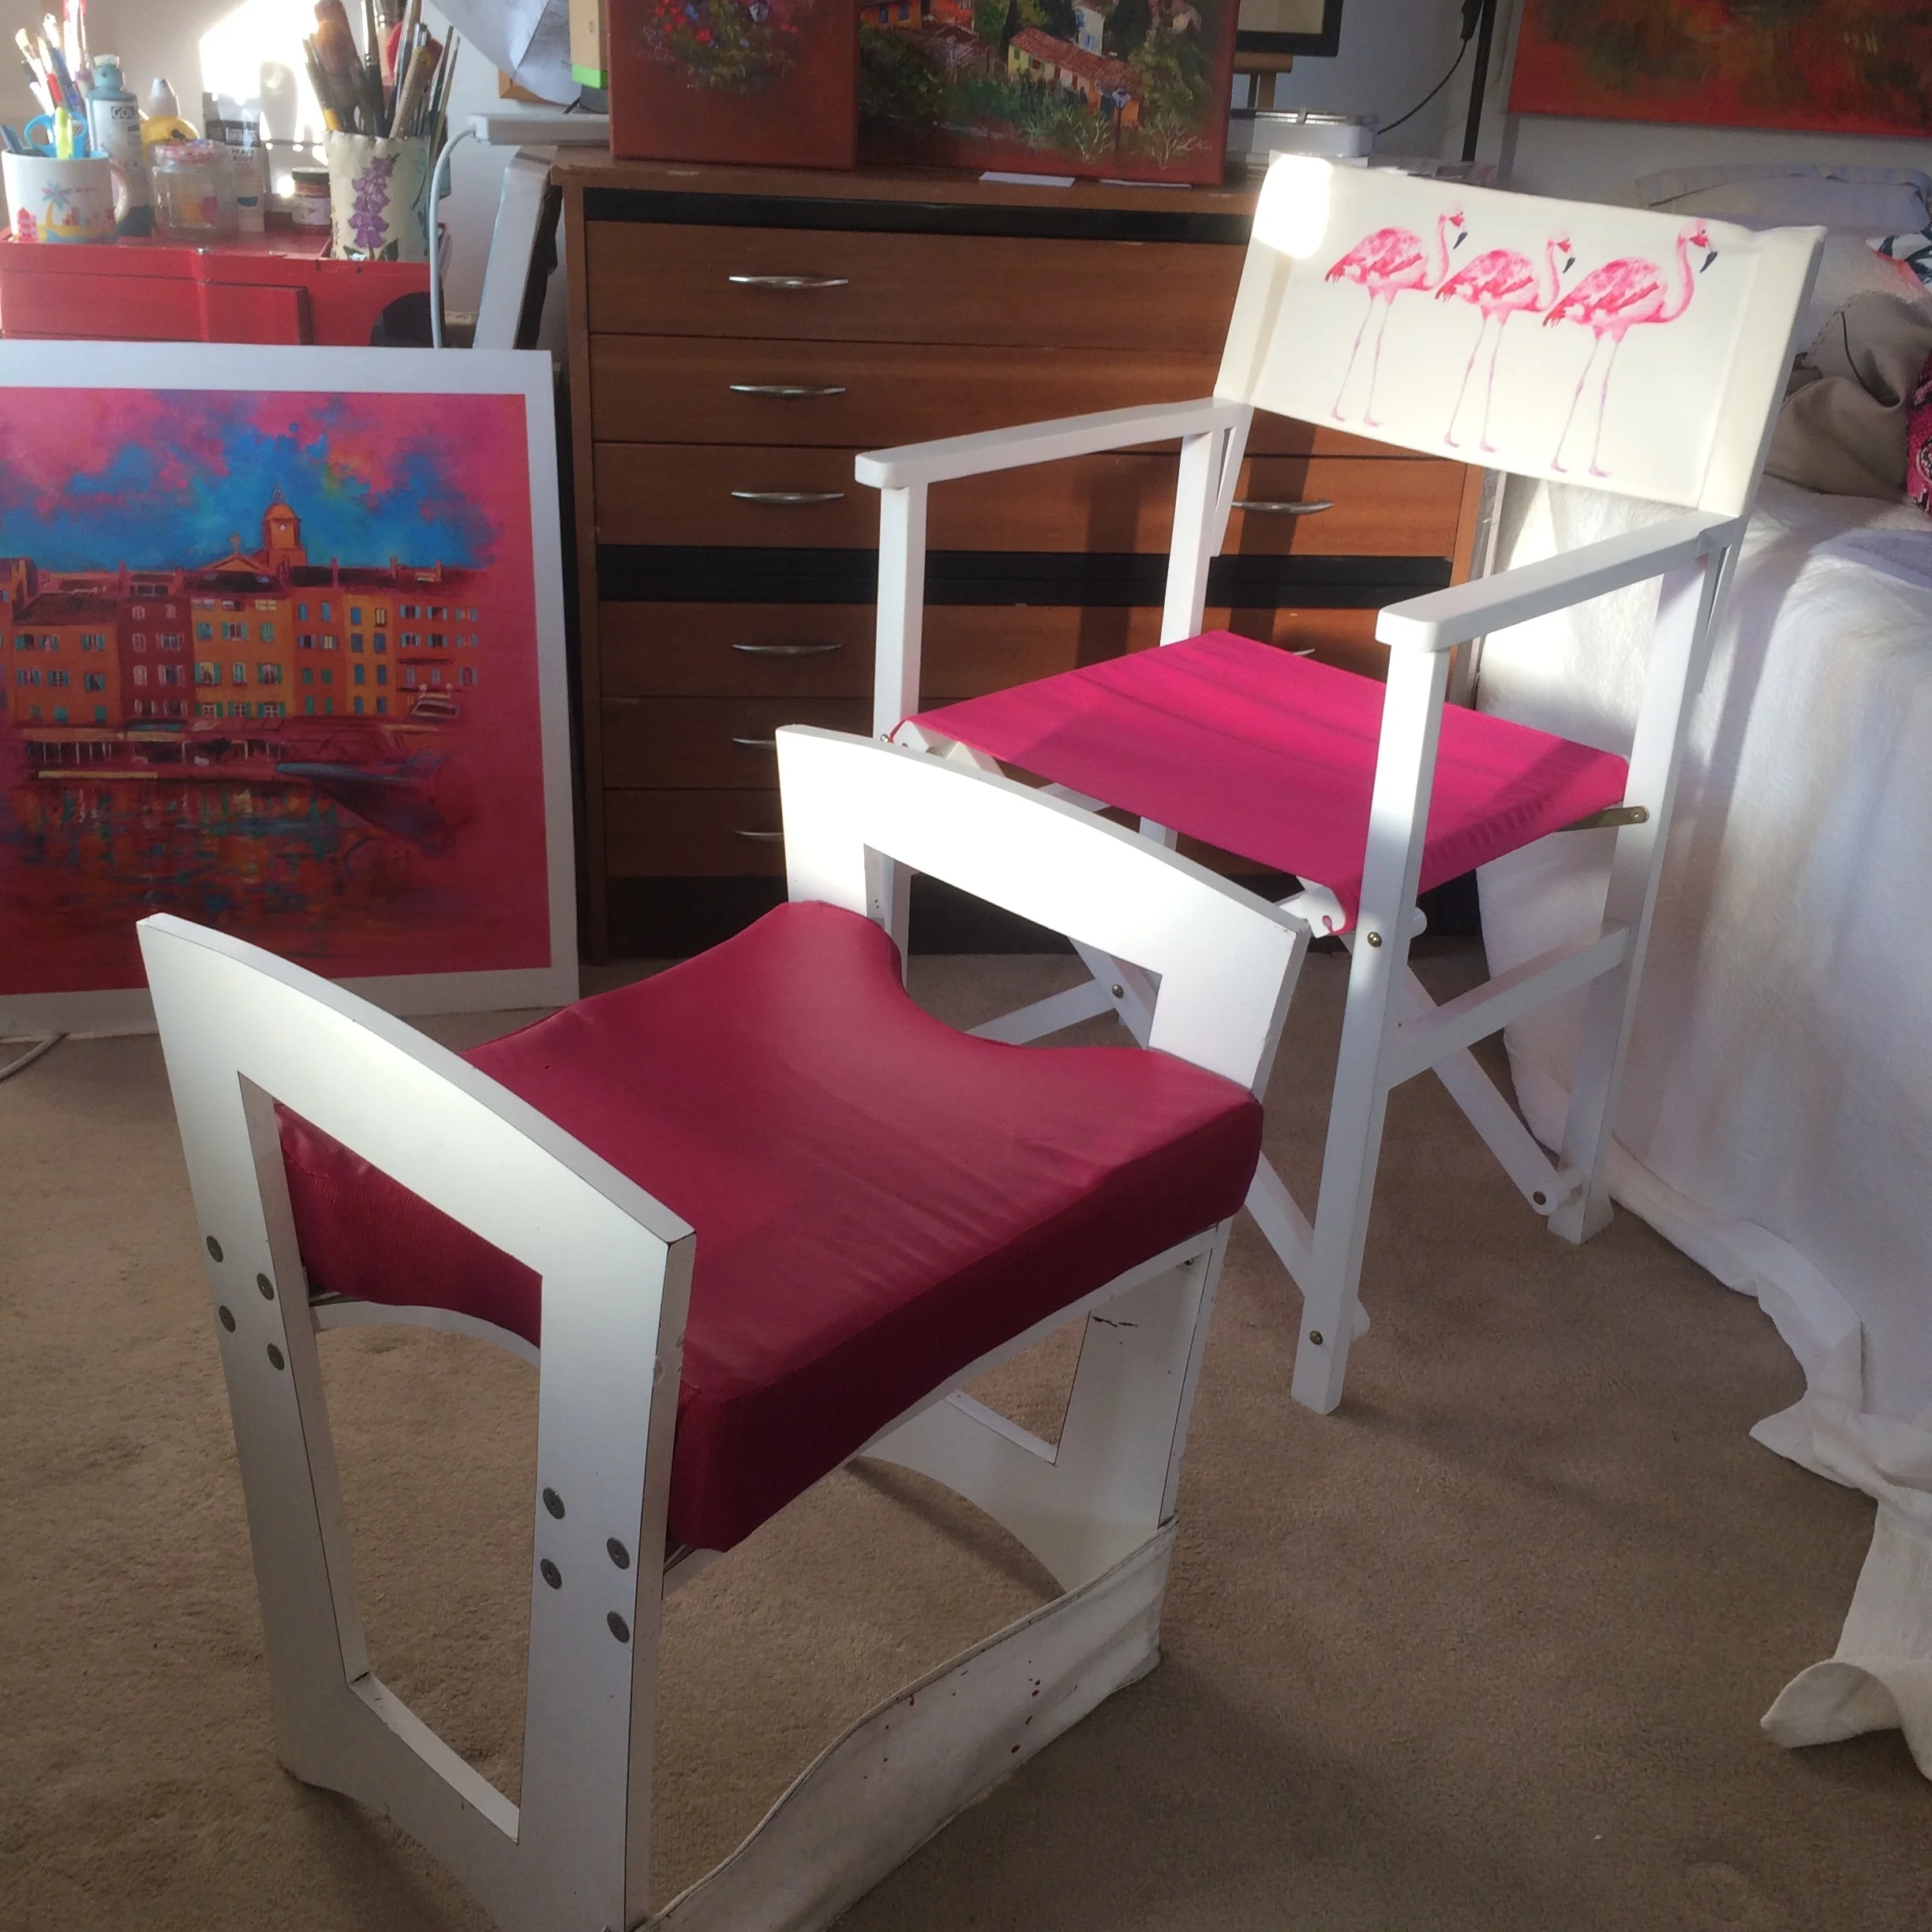
Continuing with my marathon of making cushions in all shapes and sizes, my mum asked me to recover the cushion from her trusty old stool in her studio. Amazingly, she has had it since the 70s or 80s and it was designed by her dad (my granddad).

The original cover was completely falling to bits but somehow the foam inner cushion looked fairly intact. Mum's favourite colour is bright pink and she already had a director's chair in her studio in bright pink (and covered in flamingos!), so I picked a beautiful lamb's leather in fuchsia that I've had in my leather stash for years. 

I used a sample sale purchase of bright pink ribbed upholstery fabric for the gusset and a super long invisible zip, which I struggled to sew round the curved edges of the cushion - so it doesn't quite zip up the whole way.  But this is such an improvement from what I started with...I don't think I care that much! More importantly, neither does mum!

IMG_8435.JPG
The original cushion...looking in desperate need of some attention.

The original cushion...looking in desperate need of some attention.

IMG_7736.JPG
IMG_7734.JPG

Comment

Beautiful sofa cushions

1 Comment

Beautiful sofa cushions

I am lucky enough to have access to sample sales at my current job, where I can pick up interesting food or random Christmas decorations in the middle of July! But occasionally, the fabric department sends over loads of ex-display upholstery fabric samples...and then, I just can't help myself! Although the fabric samples are fairly small (about 60 x 60 cm), some of them are like works of art. I've not heard of most of the fabric companies, but I could never justify paying the full retail price for a whole metre anyway. The samples are a perfect size for creating cushions and we recently bought a cream sofa which is in desperate need of some colours pops of colour.

IMG_7983.JPG

Armed with an array of beautiful fabric samples to choose from, I managed to select a couple of samples that were strikingly different but complemented each other:

  • First up is an African inspired print "Noir & or" "black and gold" from Pierre Frey Paris (part of their Majestic Velvet range). The fabric is a viscose/polycotton mix but the photos just don't do this fabric justice - the charcoal grey background is a heavy cotton-like tightly woven fabric with the velvet squiggle design sitting on top almost like devore. the back of the cushion is a rich gold silk fabric, but there was no label on the sample so I don't know where it is from/its composition;
  • The second cushion was made from a linen/viscose fabric in "Cinnamon" from the Lustre range of a company called Zoffany. According to their website, fabric in the Lustre range is finished with a light glaze to give a subtle sheen; the fabric also has a wonderful drape. The back sample was plainand the front sample was printed from their Edo-Fabric range, "Kanoko" in gold had a striking design in a rich gold. The zig zag design is inspired by a 1930’s Japanese Shibori document from Zoffany's archives.
IMG_8247.JPG

Now that I've made up these 2 cushions, I need to work out what other fabrics will complement these 2 designs and bring out the rest of the colours in our living room, including the beautiful tiles on the Victorian fireplace.

IMG_8350.JPG

1 Comment

Comfy bedroom cushions

Comment

Comfy bedroom cushions

This is a simple project, but one I've been meaning to do for a few months now.

Apart from the beautiful charcoal coloured Victorian fireplace, the colour scheme in our bedroom is very neutral. The walls are painted in light grey and there's a cream carpet left over from the previous owners - I haven't helped much by adding soft grey bed linen and white lacquer drawers!

To add some personality and a focal point to the room I've hung one of my mum's brightly coloured paintings of Saint Tropez over the charcoal Victorian fireplace. These cushions add a bold touch against the plain bed linen and the warm wood of the bed frame, although I think I could have been more adventurous by adding a punchy magenta piping or pompom trim! The ceiling lampshade is made from some beautiful silver crushed velvet (in Voyage Mimosa - £30 a metre from John Lewis) and I made sure that I bought extra at the time so that I could incorporate it into some other soft furnishings in the bedroom.

I finally tackled an invisible zip closure rather than my lazy pillow case fold...well I was forced into doing this or otherwise I didn't have enough silver velvet to back all three cushions! But I'm pleased that I did as they give a much more professional finish to my cushions. I also reused some feather cushion inserts rather than the cheap polyester ones and they make such a difference to the way the cushions look and feel.

I used two different fabrics for the front side of the cushions. The square cushion is made from a square remnant of a Designers Guild fabric (that I picked up for £1!) and the rectangular cushions I printed myself using my Rennie Mackintosh inspired screen print design on some navy silk taffeta. 

It was tricky to get the pictures right as there is so much sunlight streaming into the bedroom that most of my photos end up overexposed! That said, I'm very pleased with the results of the individual cushions and overall improvement to the whole room :) 

My furry little model Winston! This was the only shot where he stayed still long enough for me to take the photo...shame that you can't really see the cushions.

My furry little model Winston! This was the only shot where he stayed still long enough for me to take the photo...shame that you can't really see the cushions.

IMG_7583.JPG
IMG_7598.JPG
IMG_7597.JPG
IMG_7596.JPG
IMG_7595.JPG

Comment

White summer jacket with embroidered back (using ByHand London Victoria Blazer)

Comment

White summer jacket with embroidered back (using ByHand London Victoria Blazer)

One of the benefits of working in retail (particularly fashion retail) is the access to sample sales. Last summer, whilst hunting through piles of clothes at one of these, I found a beautiful fabric sample of a large crest embroidered on chiffon and grabbed it without another thought, knowing that I could make use of it somehow.

After thinking about how to make the best out of the sample, I settled on the idea of using it as the back panel of a jacket. 

The only jacket pattern I've ever made is the ByHand London Victoria jacket (which I've done a couple of times). It seemed like a sensible choice as it has a loose fit and would work well with draped fabrics, plus the fact that the embroidered panel was the exact size of the back panel pattern piece helped!

The panel itself was soft grey polyester chiffon with bright white embroidery for the crest design. I wanted to keep the colour palette light and neutral, perfect for summer and easy to wear with lots of outfits. 

Aiming for something a little sturdier to compensate for the delicate back panel, I made the front panels and lining made out of a cotton canvas type fabric (I don't actually know what it is, as I picked it up in the clearance section of Missan Textiles on Berwick Street). Although it was a very different fabric in both weight and texture, the cotton was fairly close in colour to the chiffon and complimented it perfectly. To continue with the theme of contrasting textures and fabrics, I chose a white woven fabric (also from Missan Textiles' clearance section...) for the sleeves and cuffs. Finally, to bring together the multitude of fabrics, I used the sleeve fabric on the collar, and the front panel fabric on the lapels. 

Despite the variety of fabrics and textures, I think the end result looks fairly balanced and falls well...its just a shame that I can't see the beautiful back panel when I wear it.  

Extra details:

  • Back Panel: I cut a second back panel out of the same fabric that I used for the front panels, which I attached the embroidered panel onto (it also doubled up as a lining).
  • Lining: to avoid the whole jacket becoming stiff or creating an imbalance in the weight of front panels versus the back, I partially lined the front panels (with no additional lining of the back), and finished all the raw seams neatly with (a bright yellow!) bias binding.
  • Cuffs: For extra definition, I used a lightweight interfacing on the cuffs, but left the collar and lapels without interfacing to allow for a softer look around the front.
  • Bottom Hem: I always have trouble with the way the bottom hem falls on this pattern, so i decided to hem the chiffon panel and cotton lining separately so they would fall nicely (first time using a rolled hem footer with my chiffon and it worked surprisingly well).

Comment

Hand printed turquoise leather clutch bag

1 Comment

Hand printed turquoise leather clutch bag

I have been waiting ages to complete this clutch bag. I bought this butter-soft turquoise leather hide at one of the Knit and Stitch craft shows in London well over a year ago.  The hide was only £10 as it was covered with light scratch marks, so it was the perfect candidate for trying out some screen printing on leather. I used my Art Deco / Charles Rennie Mackintosh inspired screen design with some navy blue screen printing ink (Jacquard professional) so it would show up against the bright turquoise leather. Once I had screen printed over the entire surface of the leather with, most of the imperfections were well hidden by the intricate design. 

The leather hide was quite thin (possibly intended for garment making rather than bags). Although I wanted a slouchy finish to my clutch bag, it needed a bit more body/structure. I picked up something called "spacer" material from the Cloth House clearance sale on Berwick Street in London ages ago (I'm told that it is used to add structure in garment making so it seemed like the right choice).

After a nice few warm sunny days this week, I thought Spring had finally sprung, but the grey clouds and colder temperatures have returned! So despite finally finishing this little bag, it definitely goes with more of my summer clothes so will have to wait a little longer for its first big outing!

The all important details:

  • Bag pattern: I designed the patten pieces myself using a "T- shaped" bag construction. I find this one of the easiest bag constructions to design and make as you only need one pattern piece for the body of the bag, and (if your bag needs one) a separate piece for a flap...meaning minimal stitching time, which is great when you're using a domestic sewing machine that often struggles with leather;

  • Tips for sewing leather using a domestic machine: I changed my sewing machine footer to a walking footer and changed the needle to a leather needle; I adjusted the tension on my machine and used bonded nylon thread rather than regular thread (as is commonly used for upholstery - Coats is a great brand);
  • Magnetic closure: I used a set of hidden magnets to secure the bag closed, the first stitched into the lining of my bag and the second hidden within the decorative detailing on the front of the bag flap;
  • Adding structure using "Spacer" material: this was my first attempt at using this material which looks like layers of webbing or netting. It bends and moves easily which is helpful when turning the bag inside out, but keeps its shape.  
  • Using Rivets: something I've noticed with a t-shape construction, is that the side gussets poke out past the end of the flap....which isn't very nice to look at. Rivets are usually used to secure handles to bags, but a couple of carefully positioned rivets pinching the side gussets inwards worked perfectly to hide the excess side gusset. Perhaps next time, I won't use the spacer material for the entire the bag and only use it to add extra body to the front and back. 
The shape of the bag pattern, showing the measurements of the height and width of the bag; the depth of the gussets; seam allowance and fold lines. 

The shape of the bag pattern, showing the measurements of the height and width of the bag; the depth of the gussets; seam allowance and fold lines. 

My leather hide cut out to size (flap not shown). I also cut out the same size in the lining and spacer fabric.  

My leather hide cut out to size (flap not shown). I also cut out the same size in the lining and spacer fabric.  

Rivets: before and after. The rivets were carefully positioned to pinch the side gussets inwards to stop them poking out past the edge of the flap. 

Rivets: before and after. The rivets were carefully positioned to pinch the side gussets inwards to stop them poking out past the edge of the flap. 

1 Comment

Hand painted tablet sleeve in 15 minutes!

Comment

Hand painted tablet sleeve in 15 minutes!

Second completed project of the week is a little protective sleeve for my mum's Amazon Fire tablet. A few weeks back, mum had a go at painting with acrylic on to some scraps of pale blue leather and there was just enough leather to wrap round her tablet that we bought her for Christmas. I added a couple of rivets at the top corners for stability. And voila!

image.jpg
image.jpg

Comment